If you’re looking for a fast way to spin up a Stripe checkout experience in your app, look no further.
Stripe is a payment gateway and processor which allows merchants to provide their customers with credit card payments. Stripe has released the React Native SDK and with that in mind, we can go ahead with the tutorial.
In this tutorial, we’ll show you how to integrate Stripe with React Native using the Stripe React Native SDK and the StripeProvider component.
Before we get started, make sure you have the following:
- An account with Stripe. If you don’t have one, register here
- A React Native application, created either via Expo or React Native CLI
- A backend that communicates with Stripe API. We’re using our own implementation which was described here
Environment setup
First, make sure to install the Stripe React Native SDK inside your project:
					npm install @stripe/stripe-react-native
// or yarn
yarn add @stripe/stripe-react-native
There’s one more step for CocoaPods in iOS:
cd ios && pod install
And that’s it. We can begin implementing our frontend side.
Stripe initialization
We need to wrap our App.tsx with StripeProvider so that we can use the useStripe hook inside our checkout screen.
StripeProvider requires a publishableKey which you can obtain from Stripe.
For our demo application, the code is as simple as this:
					const App = () => {
  return (
    <StripeProvider publishableKey="YOUR_PUBLISHABLE_KEY_HERE">
      <Navigation />
    </StripeProvider>
  );
};
Setting up our checkout screen
First thing’s first, let’s import the hook and some components from the react-native library:
					import { useState, useEffect } from "react";
import {
  Alert,
  Image,
  StyleSheet,
  Text,
  TouchableOpacity,
  View,
} from "react-native";
import { useStripe } from "@stripe/stripe-react-native";
					const styles = StyleSheet.create({
  mainContainer: {
    justifyContent: "center",
    alignItems: "center",
    flex: 1,
    backgroundColor: "gray",
  },
  boxedContainer: {
    width: "80%",
    paddingHorizontal: 16,
    paddingVertical: 8,
    borderRadius: 5,
    backgroundColor: "#9c333c",
  },
  cardContainer: {
    flexDirection: "row",
    backgroundColor: "white",
    paddingHorizontal: 16,
    alignItems: "center",
    paddingVertical: 8,
  },
  image: { width: 80, height: 40 },
  row: {
    flexGrow: 1,
    alignItems: "center",
    flexDirection: "row",
    justifyContent: "center",
  },
  checkoutButton: {
    paddingHorizontal: 8,
    paddingVertical: 4,
    borderRadius: 5,
    backgroundColor: "#db0d48",
  },
  headingText: { fontSize: 24, color: "white" },
  cartItemText: { fontSize: 16, color: "black" },
  divider: { marginLeft: 16 },
  checkoutAreaContainer: {
    alignItems: "center",
    marginTop: 16,
  },
  checkoutText: { fontSize: 16, color: "white" },
  cartContainer: { marginVertical: 8 },
});

const CheckoutScreen = () => {
  const { initPaymentSheet, presentPaymentSheet } = useStripe();
  const [loading, setLoading] = useState(false);
  const [items, setItems] = useState([]);
Next, we’ll create a function called fetchPaymentSheetParams that fetches the necessary parameters for initializing the payment sheet from a server. These parameters include the payment intent ID, ephemeral key, and customer ID.
					  const fetchPaymentSheetParams = async () => {
    const response = await fetch(`https://yourBackendApi/paymentIntent`, {
      method: "POST",
      headers: {
        "Content-Type": "application/json",
      },
    });

    const { paymentIntentId, ephemeralKey, customerId } = await response.json();

    return {
      paymentIntent: paymentIntentId,
      ephemeralKey,
      customer: customerId,
    };
  };
Now, let’s create a function named initializePaymentSheet that uses the initPaymentSheet function from the useStripe hook to initialize the payment sheet. This function should be called on component mount.
					  const initializePaymentSheet = async () => {
    const { paymentIntent, ephemeralKey, customer } =
      await fetchPaymentSheetParams();

    const { error } = await initPaymentSheet({
      merchantDisplayName: "Merchant",
      customerId: customer,
      customerEphemeralKeySecret: ephemeralKey,
      paymentIntentClientSecret: paymentIntent,
    });

    if (!error) {
      setLoading(true);
    }
  };

  useEffect(() => {
    initializePaymentSheet();
  }, []);
Finally, let’s create a function called openPaymentSheet that uses the presentPaymentSheet function from the useStripe hook to present the payment sheet to the user. This function should be called when the user clicks the checkout button.
					  const openPaymentSheet = async () => {
    const { error } = await presentPaymentSheet();

    if (error) {
      Alert.alert(`Error code: ${error.code}`, error.message);
    } else {
      Alert.alert("Success", "Your order is confirmed!");
    }
  };
Now that we have the functions for initializing and presenting the payment sheet, let’s render the component. We’ll display a list of items in the user’s cart, and a checkout button that they can use to open the payment sheet.
					  return (
    <View style={styles.mainContainer}>
      <View style={styles.boxedContainer}>
        <View style={styles.cartContainer}>
          <Text style={styles.headingText}>Your Cart</Text>
        </View>
        {items.map((item) => (
          <View key={item.id} style={styles.cardContainer}>
            <Image
              source={{
                uri: item.imageUrl,
              }}
              style={styles.image}
            />
            <View style={styles.row}>
              <Text style={styles.cartItemText}>{item.name}</Text>
              <View style={styles.divider} />
              <Text style={styles.cartItemText}>${item.price}</Text>
            </View>
          </View>
        ))}
        <View style={styles.checkoutAreaContainer}>
            <TouchableOpacity
            disabled={!loading}
            onPress={openPaymentSheet}
            style={styles.checkoutButton}
            >
            <Text style={styles.checkoutText}>Checkout</Text>
          </TouchableOpacity>
        </View>
      </View>
    </View>
  );
};
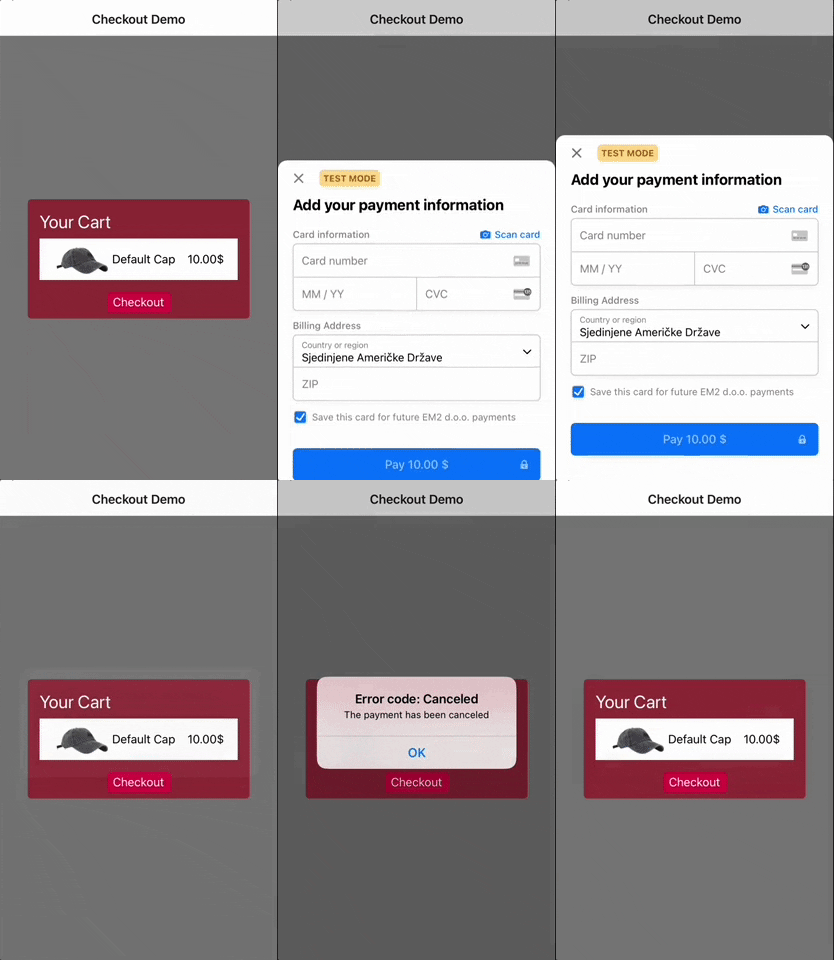
Here is the final result:

And that’s it! With just a few lines of code, you can easily integrate Stripe with your React Native app using TypeScript. Make sure to follow Stripe’s documentation for best practices and additional features you can implement.


